Stunning Tips About How To Draw Sf6

Draw The Structure Of Sf4 And Sf6 Explain Their Shape On Basis

Sf6 Circuit Breaker Schematic Diagram Pr

Sf6 Concept Art 2 Out Of 5 Image Gallery

Sf6 Lewis Structure, Molecular Geometry, Hybridization, And Mo Diagram

Steve Mack On Twitter "man I Wanna Draw Sf6 Characters Right Now

Sf6 Gas Density Meter Pressure Gauge 1.02.0 Bar Abs Wesen

How to draw sf6?here's a brief description of who i am, hey, i am delphi.
Unveiling the Hexafluoride: A Guide to Drawing SF6
Understanding Sulfur Hexafluoride's Structure
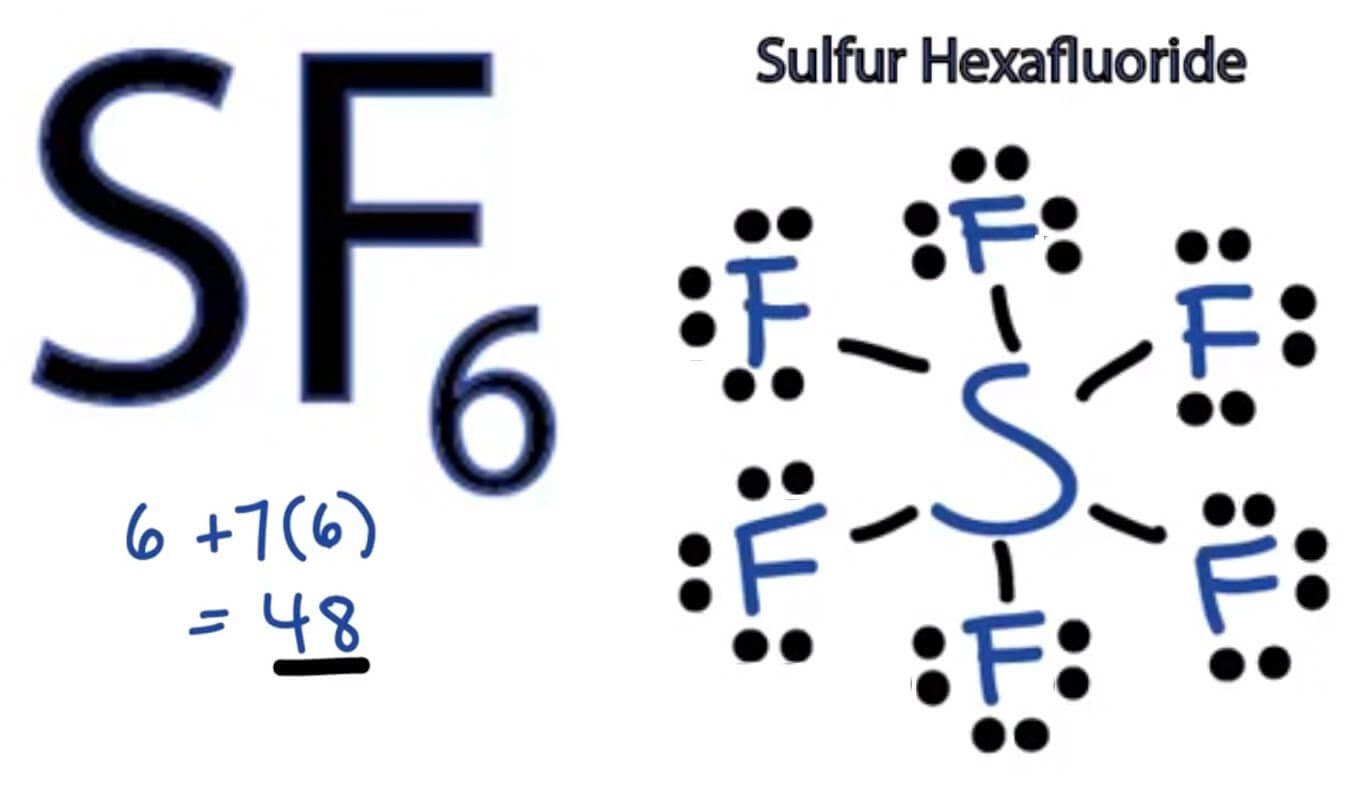
Sulfur hexafluoride, or SF6, is a fascinating molecule. Its unique octahedral geometry makes it a subject of interest in chemistry and related fields. But how exactly do you visually represent this structure? Let's delve into the process, starting with the fundamental understanding of its composition. SF6 consists of a central sulfur atom bonded to six fluorine atoms. These bonds are arranged in a symmetrical, three-dimensional fashion, forming an octahedron. Imagine a cube; the sulfur atom sits at the center, and the fluorine atoms occupy the six vertices. This spatial arrangement is crucial for understanding its properties.
The key to accurately drawing SF6 lies in representing this three-dimensional structure on a two-dimensional surface. It's a bit like trying to flatten a globe onto a map. We'll explore techniques to convey this depth and perspective shortly. Remember, each bond in SF6 is covalent, meaning electrons are shared between the sulfur and fluorine atoms. This sharing leads to a stable, non-polar molecule, which contributes to its unique characteristics. The symmetry of the molecule is paramount, and your drawing should reflect this.
Before you even pick up a pencil, visualize the octahedron. Mentally rotate it, look at it from different angles. This mental exercise will greatly assist you when you translate this image onto paper. Consider the bond angles: each F-S-F angle is 90 degrees, a critical aspect of the octahedral geometry. These angles are what give SF6 its characteristic shape. Don't worry if it seems daunting at first; practice makes perfect, and we'll break down the steps to make it more manageable.
The sulfur atom's electronic configuration allows it to accommodate six bonding pairs, a departure from the typical octet rule. This expansion of the octet is a key factor in SF6's stability. When drawing, remember the central sulfur is the nucleus of the structure, and the fluorine atoms are its surrounding partners. Each fluorine atom contributes to the overall stability and symmetry of the molecule. The electron density is evenly distributed, leading to its non-polar nature.
Step-by-Step: Drawing SF6's Octahedral Shape
The Foundation: Central Sulfur and Initial Bonds
Start by drawing a small circle or dot to represent the central sulfur atom. This is the nucleus of your SF6 molecule. From this central point, draw four bonds extending outwards in a cross-like formation. These represent four of the six fluorine atoms. Think of it as drawing a plus sign, but with the lines representing chemical bonds. These bonds should be roughly equal in length to maintain the symmetry of the octahedron. This initial step is crucial for establishing the base structure.
Now, add the remaining two bonds. These should extend perpendicularly, one coming out of the plane of the paper (or screen) and the other going behind it. To indicate this depth, you can use a wedge for the bond coming out and a dashed line for the bond going behind. This technique helps convey the three-dimensional aspect of the molecule. Imagine a cube, with these bonds pointing to the corners on the top and bottom. The use of wedges and dashed lines is a standard convention in chemistry to show spatial orientation. This adds a layer of realism to your drawing.
Next, attach the fluorine atoms to the ends of each bond. Represent them as small circles or simply by writing "F." Ensure they are equidistant from the central sulfur atom. This equal spacing reinforces the octahedral symmetry. Double-check the bond angles; they should ideally be 90 degrees. While a perfect 90 degrees might be challenging to achieve by hand, aim for close approximations. The precision in bond angles is key to accurately portraying the molecule's shape.
Refine your drawing by ensuring all bonds are of roughly equal length and that the fluorine atoms are evenly spaced. This visual balance is essential for accurately representing SF6's structure. If you are using digital tools, utilize features like grids or rulers to maintain accuracy. If you are drawing by hand, consider lightly sketching guidelines first and then refining your drawing. Remember, clarity and symmetry are paramount in chemical representations.
Adding Depth: Representing 3D Structure
Wedges and Dashes: Conveying Spatial Orientation
As mentioned earlier, using wedges and dashed lines is crucial for representing the three-dimensional aspect of SF6. A wedge, a triangle that gets wider as it extends from the sulfur atom, indicates a bond coming out of the plane. A dashed line, conversely, indicates a bond going behind the plane. These conventions are universally understood in chemistry and help avoid ambiguity. Imagine holding a model of SF6; some bonds would be closer to you, and some further away. Wedges and dashes visually replicate this concept.
When drawing, make sure the wedge starts narrow at the sulfur atom and widens as it extends to the fluorine atom. This gradual widening helps create the illusion of depth. The dashed line should be evenly spaced and consistent in its dashes. This consistency ensures clarity and avoids confusion. Practice drawing these wedges and dashed lines separately to master the technique. You can even use different line weights to further emphasize depth. A thicker wedge and a thinner dashed line can enhance the visual effect.
Consider the perspective. If you rotate the molecule, the wedges and dashed lines will change accordingly. This rotation helps visualize the molecule from different angles. Practice drawing SF6 from various perspectives to enhance your understanding. This exercise will also improve your ability to represent complex molecular structures. Remember, the goal is to create a clear and unambiguous representation of the molecule's three-dimensional shape.
Visualizing the molecule in layers can also be helpful. Imagine the central sulfur atom as the core, with the four in-plane fluorine atoms forming a square around it. The wedge and dashed bonds then extend above and below this square. This layer-by-layer approach can simplify the drawing process and help maintain accuracy. It breaks down a complex structure into manageable components, making it easier to visualize and draw.
Tips for Clarity and Accuracy
Using Tools and Techniques for Precise Drawings
For those aiming for professional-looking drawings, using tools like rulers, compasses, and protractors can greatly enhance accuracy. If you're using digital tools, take advantage of features like grids, alignment tools, and layering. These tools help maintain precision and symmetry. Consider using a template or a pre-drawn grid as a guide. This can save time and ensure consistent results. Digital tools also allow you to easily correct mistakes and refine your drawing.
Practice drawing individual components, such as bonds and fluorine atoms, before assembling the entire molecule. This practice helps develop muscle memory and improves consistency. Experiment with different line weights and shading techniques to add depth and visual interest. Lightly shading the fluorine atoms can make them stand out. You can also use different colors to highlight specific aspects of the molecule. However, ensure that the colors don't obscure the essential structural details.
If you're drawing by hand, use a sharp pencil to ensure clean lines. A dull pencil can lead to smudged or unclear drawings. Consider using a drafting pencil for finer control. Erase unnecessary guidelines and stray marks to maintain clarity. Cleanliness is crucial in chemical drawings, as it enhances readability. Regularly sharpen your pencil and use a good quality eraser.
When presenting your drawings, provide a clear legend or caption explaining the components and conventions used. This helps avoid ambiguity and ensures that your audience understands your representation. For example, you can specify that wedges represent bonds coming out of the plane and dashed lines represent bonds going behind. Consistency in your labeling is essential. Make sure your drawing is self-explanatory, even to those unfamiliar with SF6.
Applications and Relevance of SF6
Beyond Drawing: Understanding SF6's Significance
SF6 is not just a molecule to be drawn; it has significant practical applications. It's widely used as an electrical insulator in high-voltage equipment like circuit breakers and transformers. Its excellent dielectric properties make it ideal for this purpose. Understanding its structure helps explain its stability and non-reactivity, which are crucial for its industrial applications. The stability of the bonds contributes to its non-flammability. This makes it a safer alternative to other insulating gases.
However, SF6 is also a potent greenhouse gas, contributing to climate change. Its long atmospheric lifetime and high global warming potential make it a concern. Efforts are being made to find alternatives and reduce its emissions. Understanding the molecule's properties is essential for developing these alternatives. Research into new insulating materials is ongoing, with a focus on sustainability. The environmental impact of SF6 highlights the importance of responsible chemical usage.
In the medical field, SF6 is used in certain eye surgeries. Its properties allow it to create a temporary gas bubble that helps repair retinal detachments. This application showcases the versatility of SF6. The gas bubble provides support during the healing process. This medical use, while specialized, demonstrates the molecule's unique characteristics. The controlled use of SF6 in medical procedures is carefully regulated.
Understanding the molecular structure of SF6 is essential for various scientific and industrial applications. From electrical insulation to medical procedures, its properties are leveraged in diverse fields. As technology advances, understanding and manipulating molecular structures becomes increasingly important. The ability to accurately represent molecules like

The Most Common Gasinsulated Switchgear (gis) Faults And A Case Of

Sf6 Concept Art 5 Out Of Image Gallery

I Did Draw All 8 Classic Characters From Sf6 In Their Ssf2 Character


Lewis Structure Molecular Diagram Nhc Of Nh2

Sf6 Circuit Breaker Schematic Diagram Pr

Pole Mounted Sf6 Load Break Switch Rockwill Electric Group
Lab 9 Bonding And Molecular Shapes Compound Lewis Structure Report

Ken Vs Ryu Work In Progress. I'm Glad I Finally Had Some Time To Draw

Sf6 (sulfur Hexafluoride) Lewis Structure

Lewis Structure Of Sf6 (sulfur Hexafluoride) Youtube
Sf6 Molecular Geometry, Lewis Structure, Shape, And Polarity

Street Fighter 6 Dlc 10 Characters Must Add Page

Sf6 Lewis Structurelewis Structure Of (sulfur Hexafluoride)draw
Draw The Lewis Structure For Sf6

Generating An Mo Diagram 3.3.4 Assembling A Complete Dia

A.k.i Draw Reaction Sf6 Youtube
